5' X 8' SINGLE AXLE TRAILER: PRE-FINISHING
GALVANIZING AND PAINTING PREPARATION
Depending on the type of finish you are planning for your trailer, there are a couple of things that need to be done prior to either. If you are planning on galvanizing your trailer, please read this first - Galvanizing and painting here - Painting
If you are painting your trailer, you will need to drill drain holes in the tailgates as shown below to allow rain water to drain from the tailgate.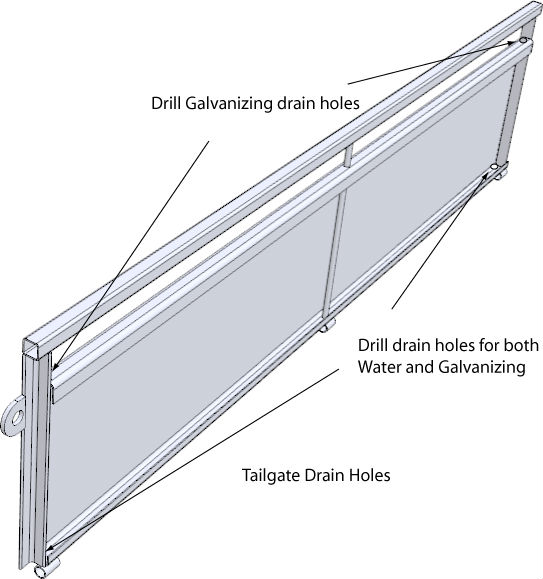
With either option, go over the trailer with a hand grinder with a flapper disc attached and clean any burrs, sharp edges, left over welding slag and spatter. Remove any paint, crayon or grease that may be on the trailer with an alcohol or solvent based cleaner.
Use a square or rat tail file to remove any burrs from inside the box section uprights, tongue and chassis rails, including the tailgates.
Galvanizing drain holes are extremely important to ensure that your trailer is fully coated with galvanizing, inside and out, and to prevent your trailer deforming when in the galvanizing bath.
The cross members ideally should have been pre-drilled prior to the chassis being welded, but if not now is the time to do this. Two holes at least 5/16" in diameter (3/8" holes are ideal for the cable side of the trailer to allow the cable to pass through) must be drilled on one side of the vertical face of the cross members at each end. One hole needs to be drilled on the underside of the cross member at each end.
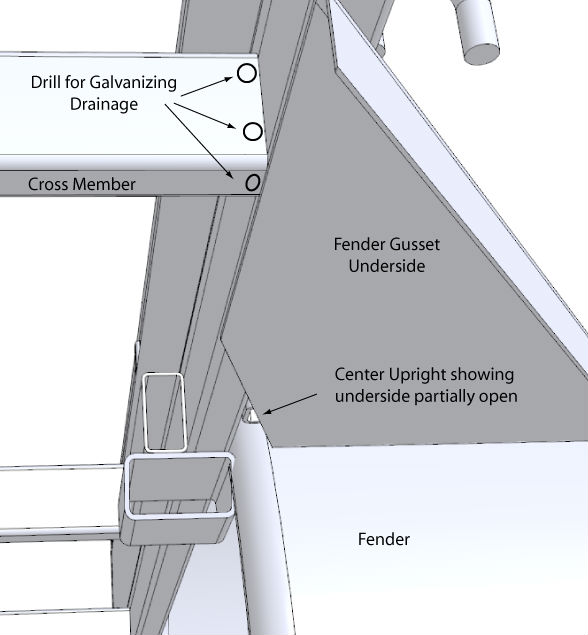
Wherever a piece of hollow section (SHS or RHS) is blocked, it requires drilling. The tie rails along the sides require a hole drilled through both sides at the junction with the end uprights.
The side panel requires holes drilled on the top where it meets the end and center uprights (see pictures below)
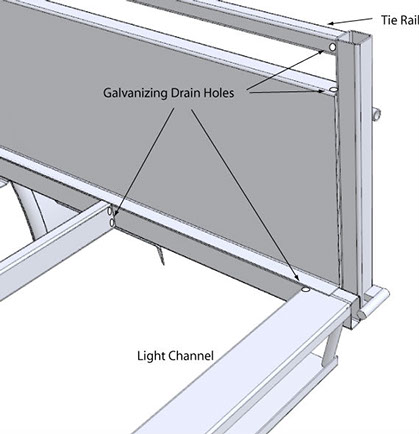
Drill holes in the light channel as shown above to prevent galvanizing from building up around this area.
Holes also need to be drilled in the top of the center uprights, just under the tie rail. At the bottom of the center uprights, there needs to be a partial opening at least the size of a 5/16" diameter hole or bigger. If not drill the underside of the fender brace gusset into the upright opening.
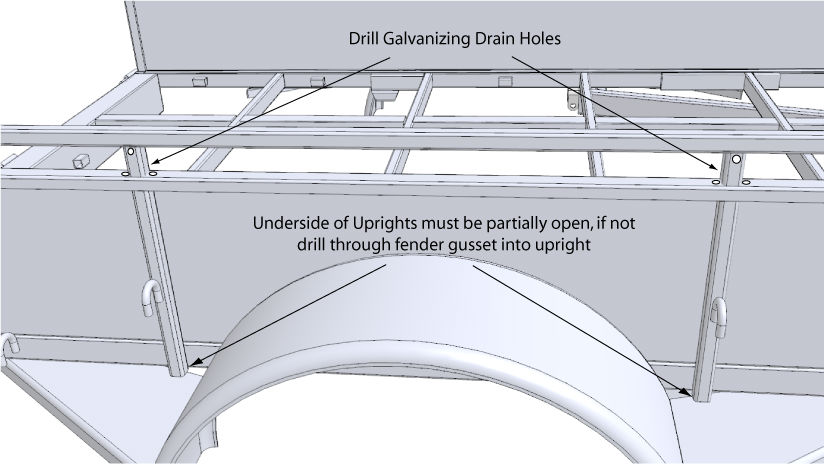
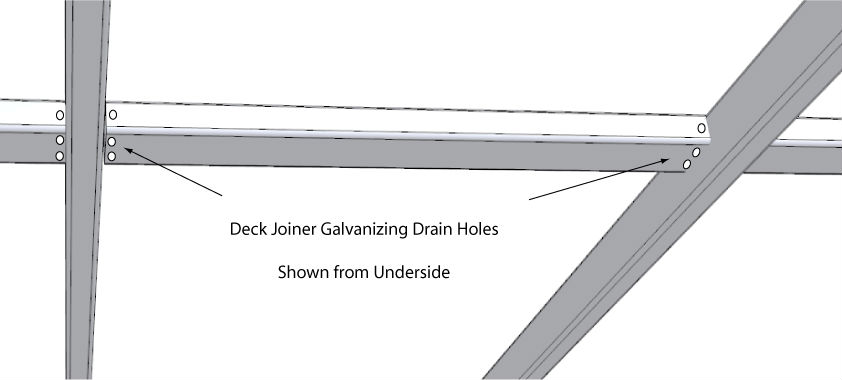
Lastly the deck joiner sections need to be drilled with two holes on the underside and one hole on the side passing all the way through. This needs to be done on both ends of each section.
Some galvanizers require the fender to be drilled in a couple of places where it meets the panel - Check with them prior to drilling even more holes in your trailer.
Tongue Drilling
Determine where you require your safety connectors to be bolted to the tongue and drill holes to suit your mounting bolts. A good position is approximately 2" back from the front of the tongue and at least 1/2 a chain link length up from the underside. If you are galvanizing, drill the hole oversize by about 3/64" to allow for galvanizing build up.
You will need to have your light cable and rubber grommet to measure up for the light cable exit hole on top of the tongue. Position this behind the coupler and centrally on the top of the tongue. Again drill the hole slightly oversize to allow for the galvanizing build up.
You can pre-drill for your lights and license plate if you have these to hand. Most new lights will come with a drilling template or guide.