4'6" X 7' SINGLE AXLE TRAILER: AXLE FITTING
AXLE FITTING
Now is a good time to fit the springs and axle to the trailer as this is the last time you will be able to work on your trailer running gear without having to get on your back.
Hub Fitting
Prepare a very clean surface and hand pack your bearings with grease, take your time, the more you can work the grease into the bearings the better.
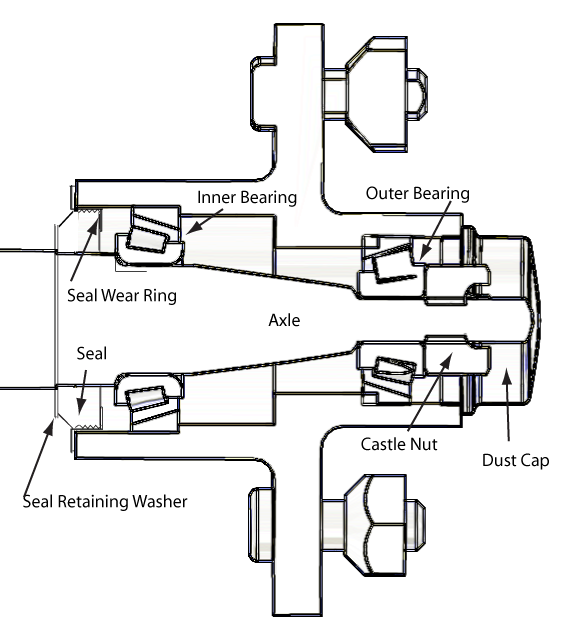
Over a clean axle, slide the seal retaining washer and seal onto the axle shoulder. Fit the larger inner back end bearing into the hub and tap on the seal wear ring. Grab a good handful of grease and apply it to the inside of the hub and slide the hub over the axle until the back bearing rests against the axle shoulder and seal.
Check that the seal is fitted into the hub and slide the smaller front end outer bearing into the hub.
Fit the washer and castle nut and tighten the nut up until resistance is felt. Give the nut a quick nip and then back off approximately 1/4 of a turn or until the slot in the castle nut lines up with the hole in the axle.
Check that the hub rotates freely and fit the split pin through the castle nut and axle and twist to lock in place.
Tap on the dust cap and repeat for the other hub.
Axle
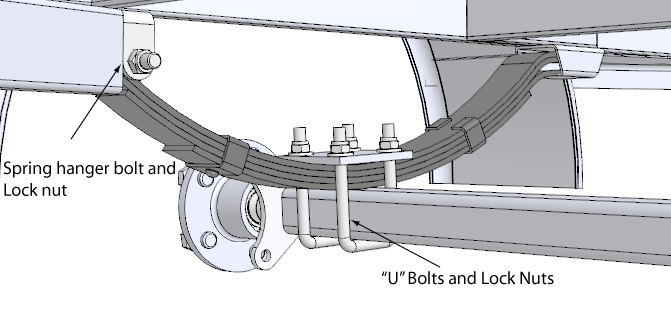
Lay the axle on the ground under your trailer with the spring holes facing upwards. Slide the "U" bolts under the axle in around the position where the springs will sit.
Position the springs over the axle so that the spring center bolt fits into the holes in the axle.

Fit the spring plate and "U" bolts together and lightly tighten up.
Twist and lift the axle to inset the tail end of the springs into the slippers and then lift the springs so they are in the spring hangers. Bolt the springs into position and do up the lock nuts. Loosen the "U" bolts and give the axle a bit of a wiggle to make sure everything is aligned correctly. Tighten everything up securely. When tightening the "U" bolt nuts, it pays to tighten each nut a little at a time, working your way around the four nuts.