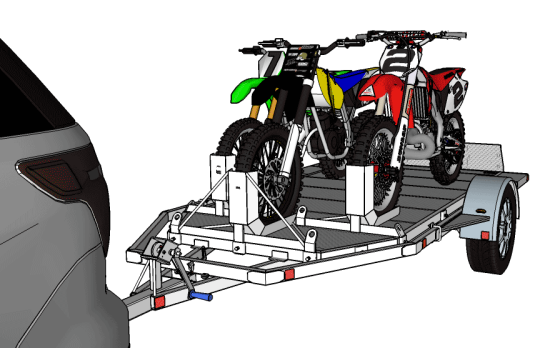
Ground Loading Trailer
Finishing
Finishing the trailer & getting ready for the road!
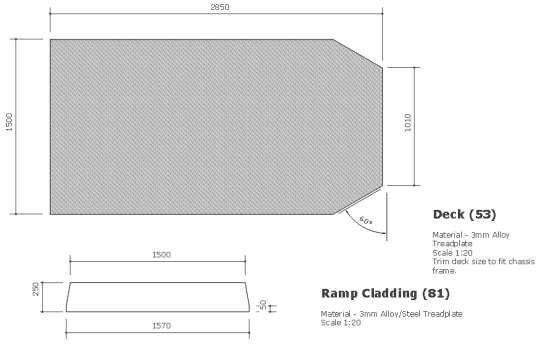
On the hinging ramp trailer, pop rivet or screw the ramp cladding to the ramp.
Cut and fasten your chosen deck material to the trailer. If using aluminium decking, make sure that there is an isolation layer between the steel chassis and the decking to add strength and to minimise electrolysis and potential corrosion problems in the future. See here for more details.
Fit the coupling using good quality bolts, spring washers and nuts. Bolt only through the top surface of the drawbar tongue - bolting through the full SHS section can cause the SHS to collapse and coupling to fail. Torque the fastenings as per the manufacturers recommendation.
Fit Safety chains and shackles to the drawbar tongue - see here for more details.
Mount the winch to the winch post and thread the nylon rope through the pulley and "D" shackle it to the shackle plate.
Fit the overcentre latch to the trailer using a thread lock paste (Loctite or similar) on the mounting bolts and adjust the latch for the correct tightness (if adjustable)

Fit reflectors onto the trailer chassis, pivot arm and guards.
Check that the spring beam "U" bolts are secure and tight.
Check the "U" bolts securing the axle sleeves to the springs are secure and tight.
Check the pivot arm bolts are secured with quality bolts and nyloc nuts.
Grease and fit the bearings, hubs and wheels and torque the stud/wheel nuts up as per the settings below.
Torque Settings for wheel nuts are
7/16" UNF 110Nm or 80 Ftlbs
1/2" UNF 125Nm or 90 Ftlbs
Double check that all lights and brakes (if fitted) are working correctly.
Put a dab of grease on the towball and hook the trailer up to your tow vehicle and double check that all the lights are working.
Grab a new vehicle registration form from your local vehicle registration centre, fill it out and register your new trailer. Attach your new license plate to your trailer and book the trailer in for a Warrant of Fitness.
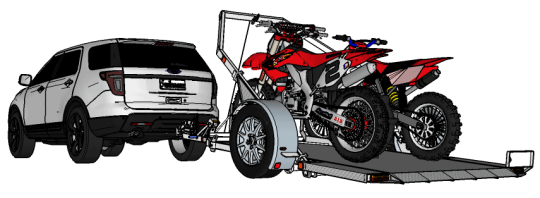
Once the trailer is warranted it is ready for loading!
After around 100kms or so, go around all the coupling bolts, spring beam "U" bolts, axle/spring "U" bolts, pivot bolts and lights and check all are in position and secure.
Good luck and happy trailering!