Ground Loading Trailer
Axle Setup
Note - Building your own axles should only be undertaken by a skilled and proficient welder using a heavy duty, industrial sized welding machine. Good weld penetration with no porosity or undercut is required to ensure the strength and integrity of the axle is not compromised. If you have any doubts about your skills, leave axle building to the professionals, poorly built and poorly welded axles can cause accidents and kill people.
Axles for offroad or extreme use trailers should always be professionally manufactured and ideally be of solid construction.
Measuring the axle
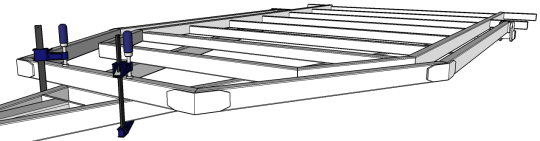
Now is a good time to put the pivot arm together on the main chassis. If you haven't already done so, tack weld the pivot arm side, corner and front rails together and bolt onto the pivot beam.
Adjust the pivot arm frame, until it is square and parallel with the main chassis. When adjustments have been made, clamp the pivot arm frame to the drawbar and fully weld the pivot arm joints.
Lightly grind the outside vertical welds and fit the side and front corner plates as shown below.
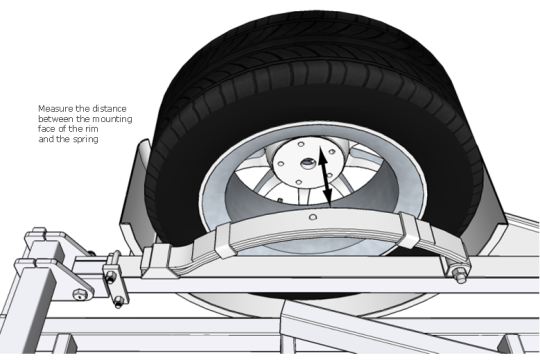
Flip the trailer upside down and fit the spring beams, and springs to the pivot arm. Use the axle measurement setup here, to assist in determining the correct hub face to hub face measurement for your stub axles.
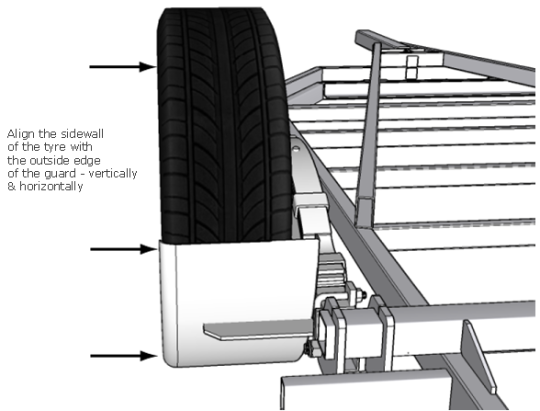
Fit the tyre and rim into the guard and align the sidewall of the tyre with the outside edge of the guard, both vertically and horizontally. It is easier if you get a mate to hold the tyre in position so you can do some accurate measuring.
Measure the distance between the mounting face of the rim (where the hub will bolt up to) and the outside face of the spring. Write this measurement down and multiply by 2 - we'll call this "A". Measure the distance between the outside of spring to the outside of spring on the other side of the trailer (measurement "B").
Add "A" & "B" together to get the hub face to hub face measurement.
Measure out on the main axle, the position for the spring centres on the stub axle sleeve, and drill to suit the spring bolt/pin diameter.

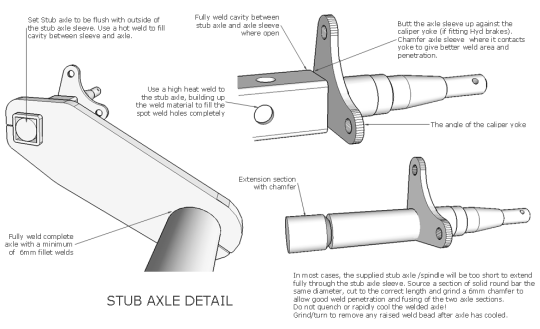
In most cases, the supplied stub axle will be too short to extend fully through the stub axle sleeve. Source a section of solid round bar, the same diameter as the stub axle. Cut to the correct length (see details below) and grind a 6-10mm chamfer around the extension to allow a good weld to join the two components together.
Allow to cool slowly - do not quench or cool rapidly.
Note - the stub axle shown below has a caliper yoke fitted for hydraulic disc brake fitting. If a non braking axle is being fitted, allow at least 25mm of stub axle shank (from the last machined shoulder of the stub axle) to the axle sleeve. If there is less than 25mm, reduce the axle sleeve length accordingly. In some cases when using hydraulic or electric braking, the length of the axle sleeve may be required to be modified/refabricated, either shorter or longer, depending on the brand of brakes you have.
Dry mount the hubs to the stub axles and position in the stub axle sleeve. Follow instructions for "Building a Trailer Axle - Dropper Plates" for setting up & welding in the stub axles. Fully weld the axles sleeves to the axle plate while welding the stub axles in position.