Car Transporter Trailer
Axles
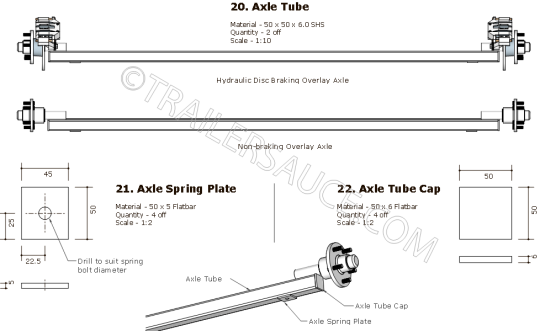
The axles for this trailer have been designed as overlay or stepped axles. Dropped axles can be fitted but issues with ground clearance will become more apparent and damage may occur to the drawbar or chassis.
The axles shown below do not contain overall dimensions for length as variations in hub and stub design as well as rim offset can dramatically alter the hub to hub length. For axle measuring see below -
Measuring axle length
Before measuring up your axle, it pays to dry fit all the components to the stub axles. In a clean, dust free area, mount the bearings, hubs and any braking hardware you are using.
Place the assembled unit inside the wheel and rim you are using, and place a straight edge across the tyre sidewall. Measure up from the sidewall edge to the highest part of the braking hardware and add at least 20mm (minimum) to this.
Remove the hub unit and measure down from the sidewall edge of the straight edge to the hubface mounting surface of the rim.
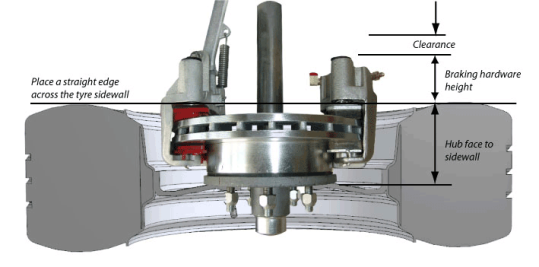
Add the measurements together, multiply x2 for both sides of the trailer and add the overall chassis width. This is the hub face to hub face measurement for your axle.
If you are using dropper extensions as below, the room these take up over and above the braking components will need to taken into consideration.
Hydraulic disc brakes inherently take up more internal space between the wheel and the trailer chassis and in most cases when the brake pads wear down, the caliper unit will move closer to the chassis.
Hydraulic and electric drum brakes take up less valuable space, but consideration needs to be given for access to the manual adjuster, any bleed nipples, park brake levers and allowing space for the cables and hoses to move and flex.
For straight beam axles, the spring centre measurement is also required before making your axle.
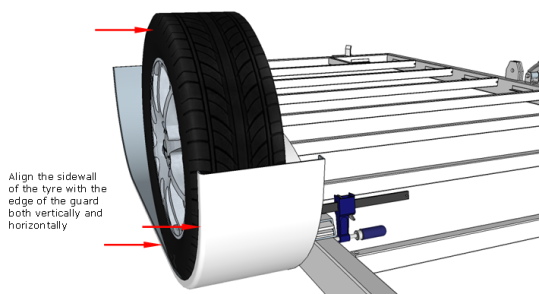
If you want to measure the axle directly off your chassis you need to clamp the guard approximately around the area where it is to go. If you are unable to clamp the guard or if the clamps will not hold, tack weld the guard in position.
Position your tyre and rim inside the guard and line up the tyre sidewall flush with the outside rim of the guard, both vertically and horizontally. If you are pushed for room within the guard, you can move the tyre out so that the true edge of the tyre tread is flush with the guard with the tyre bulge protruding from the guard edge.
Once the tyre is in position, measure from the inside hub mounting surface of the rim, to the outside edge of the spring. If your springs are set up correctly this will be the same measurement as the outside edge of the chassis. We'll call this measurement "A".
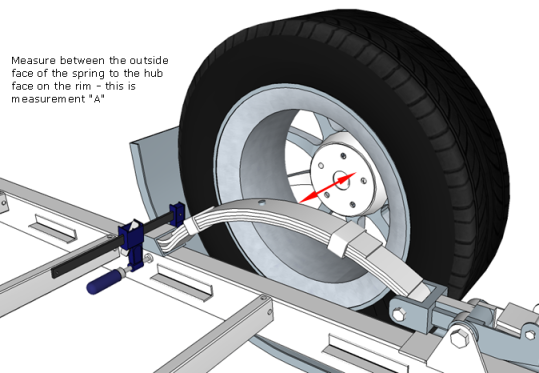
Measure your chassis width across the central part of your chassis for measurement "B". The Hub to Hub face measurements will be measurement "A" x2 (doubled) added to measurement "B".
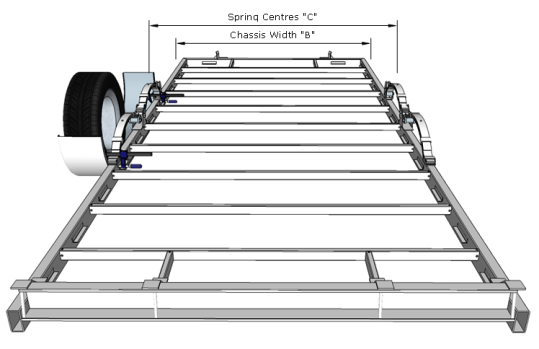
Measuring between the spring centre bolt centres will give you the spring centres. Another way to get this is to measure your chassis width "B" and subtract the width of one spring.
These measurements should be all that is needed to get the axle building started. If you are going for a different style axle (ie, stepped or dropped axle) then further measurements will be required.
Click here for more information about building overlay/stepped axles.