BUILDING A TRAILER AXLE:
BUILDING A STRAIGHT BEAM AXLE - WELD METHOD
NOTE - Building your own axles should only be undertaken by a skilled and proficient welder equipped with a heavy duty, industrial strength welding machine. Good weld penetration with no porosity or undercut is required to ensure the strength and integrity of the axle is not compromised. If you have any doubts about your skills, leave axle building to the professionals, poorly built and poorly welded axles can cause accidents and kill people.
Axle setup – Weld and Machine Method
Getting the spindles perfectly parallel and true to each other is the difficult part of building your own axle. Getting it wrong will cause a multitude of problems, from poor trailer tracking behind the tow vehicle, premature bearing failure, excessive tire wear, blowouts and even broken axles.

If like most home workshops, you will not have access to a lathe with a 4 jaw chuck and head bore to handle a 2" x 2" (50 x 50mm) piece of axle tube or have a bed length to cope with a full length trailer axle, so you will have to improvise to compensate.
If you are not using machined line pipe for your axle tubes, you will need the following equipment –
• Vernier calipers with internal jaws
• A new tape measure (no wear/sloppiness and easier to read)
• Soft face hammer (a shot filled hammer is ideal)
• Set of flat files
• Square
• Engineers Chalk or white crayon
• Flat straight work surface
Ideally you want to get a cheap set of bearings to match the good ones in you new hubs. Using a brass or mild steel drift, carefully remove the good bearing cups from the hubs (put them away somewhere nice and clean) and fit the cheapies. You will need the hubs to be dry fitted (no grease) to the stub axles later on to double check measurements and it is preferable not to do any welding or dusty work in and around your good bearings.
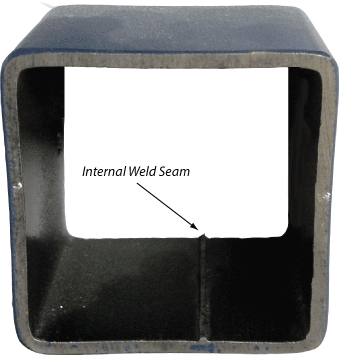
One of the problems with using ERW/welded pipe as axle tubing is the seam weld internally running the length of the pipe. You can work around this if the seam is of a consistent depth or offset from the centerline of the section (SHS only), but the best thing is to get rid of it. If you are able to access one, beg, borrow or buy an electric file (like a belt sander in miniature). This will considerably reduce the time, frustration and cut fingers from doing the job manually.
The second best option is to tack weld a 2nd cut or bastard file onto the end of a short length of 1" x 1" (25 x 25 mm) hollow section or similar. This gives the file extra leverage and cutting power and helps to get deep inside the axle tube
Clamp the axle tube to whatever will hold it steady and with the seam at the bottom, pass the modified file over the seam and file it flat. You will only need to file around 6 - 8" (150-200mm) of the seam at each end of the axle tube, but take care that you do not file past the seam especially at the outer edge of the tube. Here there is a tendency to taper off at the opening.
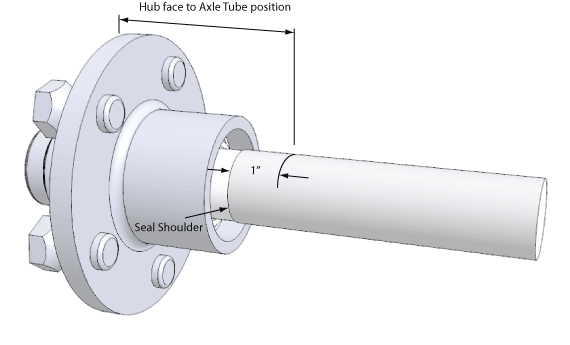
Axle tube length for straight beam axles is pretty straight forward, if the spindle has a hydraulic caliper yoke or drum brake backing plate mount, the axle tube can butt up against the flat surface of these and welded around. This doesn’t work in all situations, and you may need to set the axle tube 3/4” (20mm) or more back from the yoke/plate to get good spindle alignment and weld penetration.
If a non braking spindle is being fitted, the axle tube should not be closer than 1" (25mm) from the seal shoulder (the last bit of machined surface).
With the hub dry fitted (with the cheap bearings), measure from the hub face back to the 1" (25mm) mark on the spindle. Double this measurement and subtract it from the original hub to hub face measurement. This is the axle tube length.
Once the axle tube has been cut to length, remove any burrs inside and outside and if required, file the internal seam flat.
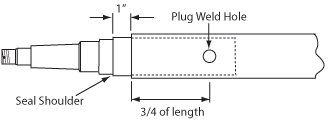
Drill a couple of plug holes in the axle tube at least 1/2" (12mm) diameter, preferably larger so that the stub axle can be secured at the back end with some good welds.
With the vernier calipers measure across the inside flats (SHS) or inside diameter (tube/pipe) of the axle tube.
Mark parallel circles around the spindle where you require weld build up. Three to four full welds should be sufficient.
Place the welding earth clamp onto the back end of the spindle (do not earth on bearing or seal mounting surfaces) and run a 1/4" - 3/8" (6-10mm) wide weld fillet around the spindle where marked.
Once welded, eye ball the welds against the axle tube to see if the weld has sufficient height to be machined.
Let the spindles cool slowly – do not quench or spray with water!
Take the spindles and a sample of the axle tube to your local machine shop and get them to machine the welds down to enable a nice snug fit within the axle tube.
Once machined, dry fit the hubs (with the cheap bearings), slide the machined spindles into the axle tube up the 1" (25mm) mark and tack weld into position.
Take a 3 or 4 point measurements from hub face to hub face around the hubs. This measurement is critical to getting the hubs exactly parallel to each other. If adjustment is needed, use the soft face hammer to tap the hubs until all measurements are exact.
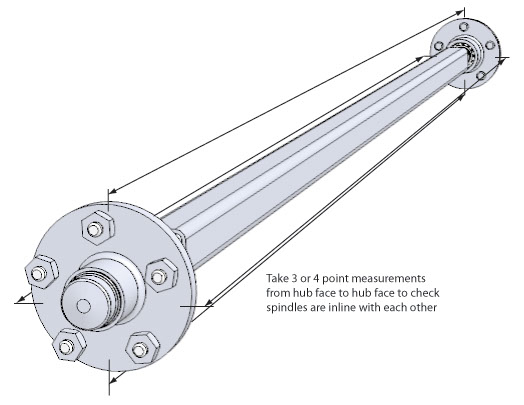
Lay another tack weld on each spindle, check your 3 or 4 point measurement and carry on this way until the spindle has at least 3 or 4 good tack welds.
Tack weld through the plug weld holes to secure the back end of the stub axle.
Set your welder up so that you can lay a good hot penetrating weld (practice on some scrap steel) and fully weld around the spindle and axle tube.
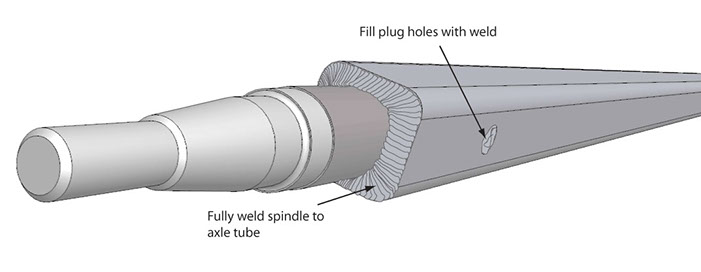
Fill the plug weld holes up until the weld is flush with the top of the axle tube.
Let the axle cool down slowly – do not quench or spray with water! Doing so can cause hardening of the steel around the weld and creating a weak, fatigue prone, stress area.
Once cool, double check the mark at the center of the axle tube. Remark if necessary and this to mark and drill your spring center holes. Spring center holes need to be around 5/8” (15mm) diameter. As always, double check your measurements before drilling. In some cases, you may find yourself drilling into the back end of the spindle. Drill deep enough so that there is clearance for the spring bolt head to fit.
If fitting spring retaining plates, now is the time to weld these on. Welds on spring retaining plates should only be done axially with the axle tube and not across the face of the axle.
Tidy up any slag and weld spatter and file or grind any sharp edges off.
Remove the hubs, knock out the cheap bearing cups, give the hubs a good clean and pack and fit the good bearings and seals to your new axles.
If you are painting the axle, use a good zinc rich etch primer coat and a couple of two pot enamel top coats to finish off.
If you are planning on galvanizing your axle, drill a 3/8" (10mm) drain hole both ends of the axle tube, at the position where the back end of the spindle sits. If your spring center holes line up with the end of the spindle, this would be a bonus.
Click here for another way of setting up and fitting spindles - The Shim Method